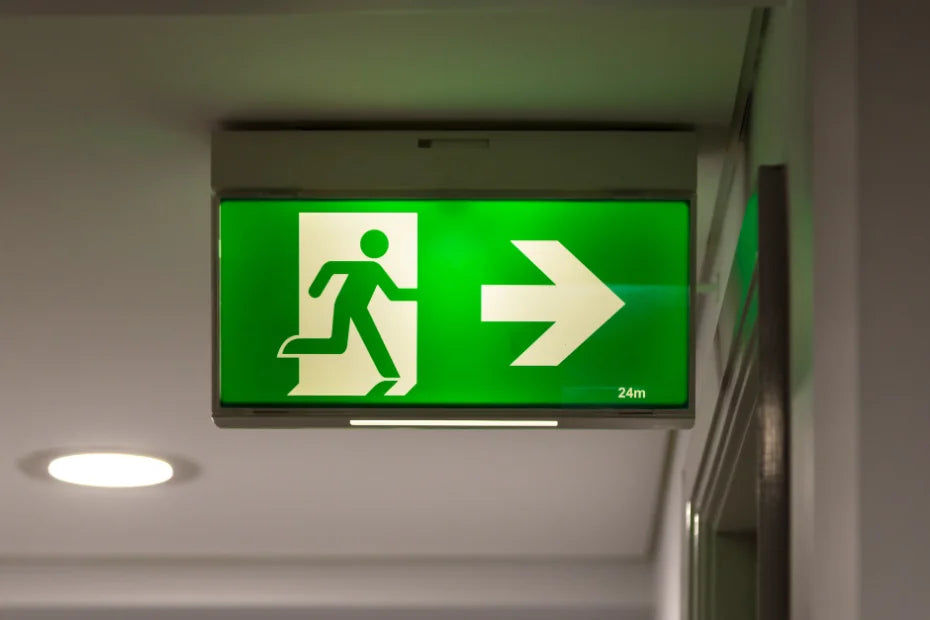
5 Reasons to Choose Running Man Emergency Lighting for Your Professional Lighting Projects
Leonard Xu
When it comes to ensuring safety in the event of an outage, you want emergency lighting that is reliable and easy to install.Running Man(or Running Man), that's exactly it: a solution designed to simplify your work while guaranteeing peace of mind to your clients. Here is5 good reasons to adopt itfor your emergency lighting projects:
1. Enhanced security that complies with standards
With a battery life of 120 minutes, the Running Man exceeds the industry standard (typically 90 minutes). Even during a long power outage, it continues to guide occupants to the exits. Designed to comply with all applicable standards, the Running Man lighting adapts to all configurations thanks to its three interchangeable pictograms. This ensures that your installations are up to standard and that everything will go smoothly during inspections.
2. Simple and flexible installation of Running Man lighting
What we love about the Running Man is its versatility: wall or ceiling installation... no matter where you need to mount it, it adapts. The result? Saves time during installation and gives you peace of mind knowing it works perfectly, no matter the space.
3. RUNNING MAN options for every lighting need
Each project has its own specificities. That's why we offer several versions of the Running Man, adapted to your needs.
The Running Manuses technologyLED , which means it consumes very little energy, while remaining efficient. It's a great way to reduce energy costs, while respecting environmental standards.
5. Compatible for all your projects
OURRunning Manis compatible from 120 to 347V to suit all your projects. The 120 to 347V power supply ensures that the integrated battery is always at full capacity and ready to intervene during power outages.
Ready to equip your projects with reliable, standards-compliant security? Contact us to learn more or place your order today and give your customers peace of mind.
2020 Energy Code: Properly Zoning Lighting Controls | Speclite
In the Speclite Sphere
Codes and Regulations
2020 Energy Code: Start by Properly Zoning the Lighting
Before selecting sensors and automation, determine which zones will be controlled, by what, and from where.
Part 1 of 6Reading time: about 7 minutesFor contractors, electricians, and designers
On a lighting project, automation often gets all the attention: motion sensors, photocontrols, dimming, and programmed schedules. Yet the first decision is much more fundamental: how will the lighting be divided into zones and controlled?
When this question is settled too late, a simple decision on the plans can turn into circuit changes, control relocations, or reprogramming on site. Proper zoning from the design stage helps create an installation that is clearer, easier to implement, and better prepared for energy-saving strategies.
The right sequence: identify the space type, define the controlled areas, locate the manual controls, coordinate the circuits, then select the automation.
A requirement now in force in Quebec
The update to Chapter I.1, Building Energy Efficiency, of the Quebec Construction Code came into force on July 13, 2024. It adopts the 2020 National Energy Code for Buildings, as amended for Quebec. Following the transition period, any building whose construction began after January 12, 2025, must comply with this version.
The requirements apply in particular to new construction and additions to commercial, institutional, and industrial buildings. Certain categories of residential buildings are also covered. According to the overview published by the RBQ, renovation, maintenance, and repair work is generally not subject to this chapter.
Four decisions to make before laying out the circuits
1
Identify the space type
Open office, warehouse, workshop, corridor, meeting room, or sales area: the actual use determines which controls apply.
2
Measure the controlled area
The area of the space determines the maximum size of the areas that each manual control can serve.
3
Group the luminaires
The boundaries shown on the plans must match the luminaires and circuits that will operate together on site.
4
Locate the controls
The control must be readily accessible and allow the occupant to see the lighting it controls, subject to the applicable exceptions.
Area limits to keep in mind
Article 4.2.2.1 of the 2020 NECB, as amended, requires at least one manual control device for each space type. This control must be capable of controlling all lighting within the area concerned.
≤ 250 m²per controlled area when the entire space is 1,000 m² or less
≤ 1,000 m²per controlled area when the entire space is more than 1,000 m²
Controls should normally be located in an accessible place from which occupants can see the lighting they control. A control may be installed remotely for safety reasons, but it must then include an indicator light and a clear label identifying the lighting controlled.
Real-world example: a 900 m² open area
Consider a 30 m by 30 m commercial or industrial area. Its total area is 900 m². Since the space is 1,000 m² or less, no controlled area may exceed 250 m².
900 m² ÷ 250 m² = 3.6→ at least 4 zones
Illustrative diagram: four 225 m² zones. For an actual project, boundaries should be adapted to the space’s use, partitions, circuits, access points, and occupancy schedules.
Four equal zones meet the limit, but they are not automatically the best layout. In a warehouse, zones might instead follow receiving, order picking, storage aisles, and shipping. In an office, they might correspond to teams, enclosed rooms, circulation areas, and perimeter areas with natural light.
What the plans should show clearly
✓ The type or use of each space
✓ The boundaries of zones Z1, Z2, Z3, etc.
✓ Controls C1, C2, C3, etc.
✓ The luminaires assigned to each zone
✓ The corresponding circuits
✓ The intended operating sequence
✓ Required sensors and photocontrols
✓ Exceptions or operational requirements
Clear coordination between the designer and the construction team reduces misinterpretations during wiring and commissioning.
Three mistakes that cost time on site
1Defining zones after the circuits
The circuits may then need to be split or reorganized, increasing rework and complicating coordination.
2Dividing zones based on floor area alone
The layout must also account for actual use, traffic flow, partitions, and occupancy schedules.
3Choosing sensors before defining the sequence
First, determine what turns on, at what level, and for how long. Then choose the right sensor.
Next: choosing the right control strategy
In Part 2, we’ll look at manual-on switching, partial automatic-on switching, bi-level control, and automatic shutoff when a space is unoccupied.
Tell us about your project →
View the official source →
Official sources
Quebec Construction Code, Chapter I.1, and amended NECB 2020
RBQ - Overview of regulations for buildings other than small residential buildings
This article provides a general summary for informational purposes. Requirements, exceptions, and conditions specific to each project should be verified with the relevant professionals and authorities.
SPECLITE | Expertise · Quality · AvailabilityLighting Specialist · info@speclite.ca · 1 855 533-8818
V2 LED Panels: The Removable Driver That Simplifies Installation | Speclite
In the Speclite Spotlight
New Products
The LED panel with a removable driver that changes the pace of installation
Five wattages, five color temperatures and a new way to organize work on large-scale projects.
V2 next generationFeatured size: 2 × 4Read time: about 6 minutes
On a job site with dozens or hundreds of panels, saving a few minutes per fixture adds up to a significant difference. That’s exactly the challenge Speclite’s new generation of LED panels addresses: offering more options with less complexity while making installation easier with a fully removable driver.
The PB24FWFC0720DV2 2 × 4 model combines five wattages and five color temperatures in a single product. This allows it to be adapted to multiple spaces without increasing the number of inventory SKUs.
5wattages
5color temperatures
9,000 lmmaximum output
125 lm/Wefficacy
0-10 Vdimming
A removable driver designed for large-scale projects
With a traditional panel, electrical connections and handling the fixture often happen at the same time. The removable driver lets you separate these tasks.
Drivers can be mounted and wired before the panels arrive.
Fixtures remain protected until installation.
Teams can better divide tasks according to the project’s progress.
The driver is easier to access for inspection and replacement.
Three clear installation steps
1The senior electrician prepares the power supply
They secure the driver enclosure in the ceiling cavity and make the initial electrical connections in accordance with the plans and project requirements.
2The junior electrician connects the connectors
Once the panel is ready for installation, the two connectors are simply joined. There’s no need to reopen the power connection that has already been completed.
3The panel is placed in the ceiling
The fixture is then positioned in the ceiling grid, completing the visible installation.
Result: on large-scale projects, initial wiring can proceed independently of panel installation. This sequence reduces the time spent handling fixtures overhead and makes it easier to coordinate tasks among team members.
One SKU, multiple configurations
5 selectable wattages
72, 60, 50, 40 or 30 W. The electrician can adjust the wattage to meet the space’s actual needs at the time of installation.
5 color temperatures
3,000, 4,000, 5,000, 5,700 or 6,500 K, allowing the same product to be standardized across different environments.
0-10 V dimming
Light output can be dimmed to 10%, making it easier to integrate with controls and energy-saving strategies.
Stable light
Flicker-free technology, a frosted polycarbonate lens and wide distribution provide uniform lighting in commercial spaces.
Technical specifications for the 2 × 4 panel
Specification
PB24FWFC0720DV2
Wattages
72 / 60 / 50 / 40 / 30 W
Color temperatures
3,000 / 4,000 / 5,000 / 5,700 / 6,500 K
Maximum luminous output
9,000 lm
Efficacy
125 lm/W
Input voltage
120-347 V · 50/60 Hz
Dimming
0-10 V, down to 10%
Light quality
CRI 80 · flicker-free · listed 180° beam angle
Power factor / THD
90% / 15%
Lumen maintenance
L70 · 50,000 hours
Construction
White steel housing · frosted polycarbonate lens · 6 kg weight
Operating temperature
-25 to 50°C
Installation
Recessed, surface-mounted or suspended with appropriate accessories
Protection
IP40 · 2 kV surge protection with grounding and 1 kV without grounding
Certifications
cETL · DLC Premium · DLC ID S-1P2NR5
LED module
168 SMD 2835 LEDs · 25-52 VDC · 1,500 mA
Three sizes to standardize the series
The new generation is available in 1 × 4, 2 × 2 and 2 × 4 sizes. This family lets you maintain a consistent look across different spaces while choosing the size that suits the ceiling.
PB14FWFC0400DV2
1 × 4 size
View product →
PB22FWFC0400DV2
2 × 2 size
View product →
PB24FWFC0720DV2
2 × 4 size
View product →
Where can you use this new series?
Offices and meeting rooms
Schools and public facilities
Retail stores and sales areas
Clinics and professional spaces
Hallways and common areas
Large-scale commercial projects
A more flexible panel, from quote to installation
The removable driver doesn’t just change the product—it helps you organize the job site more effectively. Add five wattages, five CCTs and three sizes, and you have a series designed to simplify selection, inventory and execution.
Discover the 2 × 4 panel →
Request a quote →
The technical specifications shown apply to the PB24FWFC0720DV2 2 × 4 model and are taken from the Speclite specification sheet provided. Check the specification sheet for the selected size before preparing your final quote.
SPECLITE | Expertise · Quality · AvailabilityLighting specialist · info@speclite.ca · 1 855 533-8818
Quand on gère un bâtiment, le bon moment pour faire des travaux, c'est celui où personne ne s'en aperçoit. Et pour une rénovation d'éclairage, ce moment arrive chaque année à la même période : l'été.
Écoles vides, bureaux à effectif réduit, vacances de la construction, espaces commerciaux plus tranquilles, pendant quelques semaines, vos bâtiments roulent au ralenti. C'est exactement la fenêtre qu'il faut pour remplacer des luminaires, refaire un éclairage de corridors ou convertir un stationnement au DEL, sans interrompre les activités.
Voici pourquoi l'été mérite une place dans votre planification et comment vous assurer que le projet se déroule sans accroc.
Pourquoi l'été est la meilleure fenêtre pour rénover
Un projet d'éclairage demande de l'accès aux espaces : monter dans des plafonds, couper temporairement des circuits, travailler en hauteur. Tout ça se fait beaucoup plus facilement quand les lieux sont dégagés.
Dans le milieu institutionnel, l'avantage est encore plus clair. Une école qui doit refaire l'éclairage de ses classes a, dans les faits, deux mois pour le faire. Un édifice gouvernemental ou un centre de soins profite de l'été pour planifier ses interruptions de service. Attendre l'automne, c'est souvent reporter d'un an complet.
L'été vous donne aussi une marge de manœuvre rare : le temps de bien planifier au lieu de réagir dans l'urgence. Et cette planification, c'est précisément là que se joue la réussite d'un projet.
Choisir le bon produit pour la bonne application
La première erreur dans un projet d'éclairage, c'est de magasiner un produit avant d'avoir bien défini le besoin. Un luminaire de gymnase, un panneau de bureau et un projecteur de stationnement ne répondent pas aux mêmes exigences, température de couleur, niveau d'éclairement, résistance, angle de diffusion.
Un mauvais choix se paie longtemps : un espace mal éclairé, des occupants qui se plaignent, ou pire, un produit à remplacer dans deux ans. À l'inverse, le bon produit installé une fois, c'est dix ans de tranquillité.
C'est pourquoi une étude photométrique vaut le détour avant d'acheter. Elle confirme noir sur blanc le nombre de luminaires nécessaires et leur disposition pour atteindre le bon niveau d'éclairement, au lieu de deviner. Vous évitez de suréquiper (et de payer pour rien) ou de sous-équiper (et de devoir tout reprendre).
L'équilibre entre qualité, prix et installation
Le prix d'un luminaire sur la facture ne raconte qu'une partie de l'histoire. Le vrai coût d'un projet, c'est le produit plus son installation plus sa durée de vie.
Un luminaire bon marché qui prend deux fois plus de temps à installer, ou qui rend l'âme avant la fin de sa garantie, finit par coûter plus cher qu'un produit de qualité bien choisi. L'objectif n'est pas le moins cher : c'est le meilleur rapport entre ce que vous payez, ce que coûte la pose, et ce que le produit vous donne dans le temps.
Quand vous évaluez une soumission, regardez les trois ensemble. Un fournisseur qui connaît ses produits saura vous dire lesquels s'installent vite, lesquels durent, et où mettre votre budget pour le meilleur retour.
La disponibilité du stock change tout l'été
Voici le piège que beaucoup de gestionnaires découvrent trop tard : la fenêtre estivale est courte. Si le matériel n'est pas livré à temps, le projet glisse à l'automne et la fenêtre est fermée jusqu'à l'an prochain.
C'est là que la disponibilité du stock devient aussi importante que le produit lui-même. Un luminaire parfait sur papier ne vous sert à rien s'il est en rupture pour huit semaines.
Avant de confirmer un projet d'été, posez la question directement : est-ce que les produits sont en stock, et quel est le délai de livraison réel? Un fournisseur qui tient son inventaire localement et qui livre rapidement, c'est ce qui fait la différence entre un projet réalisé cet été et un projet reporté.
Profitez de l'été pour bien faire les choses
Une rénovation d'éclairage réussie tient à trois choses : le bon produit pour votre application, un équilibre intelligent entre prix et installation, et la certitude que le matériel sera là au bon moment. L'été vous donne le temps d'aligner les trois.
Vous avez un projet en tête pour cet été? Parlez-en avec notre équipe. On peut évaluer vos besoins, faire l'étude photométrique et confirmer la disponibilité des produits pour que votre projet se réalise dans la fenêtre qui compte.
You are eligible for free shipping in Quebec.Spend $250.00 more to reach free shipping in QuebecSpend $250.00 more to reach free shipping on oversize orders in QuebecEstimate shipping to see your free shipping minimum in Quebec.Free shipping minimum in Quebec is calculated after the order is placed.
Product Comparison
Description
Price
Choosing a selection results in a full page refresh.